OMERO Importer
This section explains how to organize your Image files on the Image Acquisition workstation or in a connected Networked File System (NFS) drive to prepare for automated metadata annotation and OMERO import using the OMERO Importer Python tool.
Use Case 1: No subdirectories in the Dataset folder
During the execution of an experiment
Open an available
OMERO_import_template_wMacros_vXX.xlsmspreadsheet and fill in theProject_Nameand ``Dataset_Name``fields with unique names that can be used to identify uniquely the Project and the Dataset in OMERO and elsewhere.Save as...theOMERO_import_template_wMacros_vXX.xlsmspreadsheet using your chosen “Project Name” and “Dataset Name” as follows:Project-Name_Dataset-Name.xlsm.As you execute the different steps of the procedure, fill in the
Project-Name_Dataset-Name.xlsmspreadsheet you have created above with the indicated metadata values, as explained here.
Note
This will take some time at first. However, things will get much easier going forward, as you can often copy previously filled-in spreadsheets and only change the relevant metadata values (e.g., Date, Biosample information, Specimen information, Channel Names, etc.). Also, you can often use filled-in spreadsheets from lab mates performing the same experiment type as a starting point.
Tip
If you need to change the structure of the spreadsheet template, please ask your Data Curator for help.
In preparation for Image data OMERO import
On the folder you will use as the source for OMERO import, create a subfolder called
User_Name_OMEROwhere “User_Name” is your OMERO username.
When you are ready to import your first images to OMERO
In the
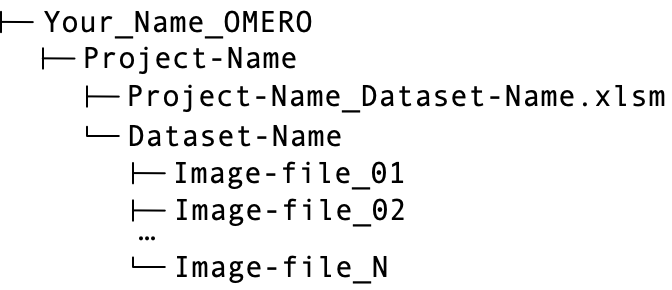
User_Name_OMEROfolder, create the following folder structure:
Note
* Use a unique name or identifier for the “Project-Name” folder and the same name used for the
Project_Namefield in theProject-Name_Dataset-Name.xlsmspreadsheet.** Use a unique name or identifier for the “Dataset-Name” folder and use the same name for the
Dataset_Namefield in theProject-Name_Dataset-Name.xlsmspreadsheet.
Move the
Project-Name_Dataset-Name.xlsmspreadsheet you filled in above to the “Project-Name” folder as follows:
During image acquisition, save image files in the corresponding Dataset folder as follows:
Tip
In the example above, no Tags will be assigned to Image data files. If you want to use Tag annotations to organize your Images within the destination OMERO Dataset, follow the instructions described in Use Case 2 below.
Open the filled-in
Project-Name_Dataset-Name.xlsmspreadsheet.Follow the instructions here, which are also found in the three workbook tabs.
Save the file.
The OMERO Importer Python tool will run according to the specifications set by your OMERO administrator.
When the import process is terminated, you will receive an email confirming that it was correctly executed or alerting you of eventual errors.
Use Case 2: Presence of subdirectories in the Dataset folder
During the execution of an experiment
Open an available
OMERO_import_template_wMacros_vXX.xlsmspreadsheet and fill in theProject_Nameand ``Dataset_Name``fields with unique names that can be used to identify uniquely the Project and the Dataset in OMERO and elsewhere.Save as...theOMERO_import_template_wMacros_vXX.xlsmspreadsheet using your chosen “Project Name” and “Dataset Name” as follows:Project-Name_Dataset-Name.xlsm.As you execute the different steps of the procedure, fill in the
Project-Name_Dataset-Name.xlsmspreadsheet you have created above with the indicated metadata values, as explained here.
Note
This will take some time at first. However, things will get much easier going forward, as you can often copy previously filled-in spreadsheets and only change the relevant metadata values (e.g., Date, Biosample information, Specimen information, Channel Names, etc.). Also, you can often use filled-in spreadsheets from lab mates performing the same experiment type as a starting point.
Tip
If you need to change the structure of the spreadsheet template, please ask your Data Curator for help.
In preparation for Image data OMERO import
On the folder you will use as the source for OMERO import, create a subfolder called
User_Name_OMEROwhere “User_Name” is your OMERO username.
When you are ready to import your first images to OMERO
In the
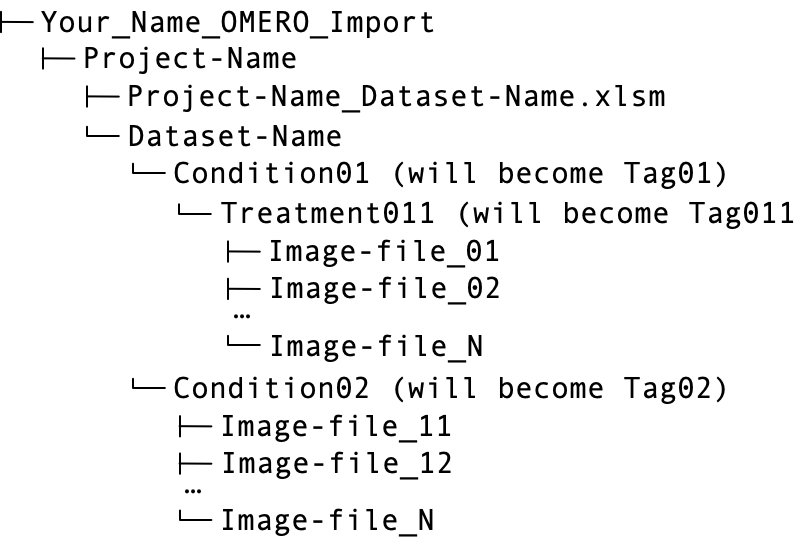
User_Name_OMEROfolder, create the following folder structure:
Note
* Use a unique name or identifier for the “Project-Name” folder and the same name used for the
Project_Namefield in theProject-Name_Dataset-Name.xlsmspreadsheet.** Use a unique name or identifier for the “Dataset-Name” folder and use the same name for the
Dataset_Namefield in theProject-Name_Dataset-Name.xlsmspreadsheet.
Move the
Project-Name_Dataset-Name.xlsmspreadsheet you filled in above to the “Project-Name” folder as follows:
During image acquisition, save image files in a nested subdirectory structure in the corresponding Dataset folder as follows:
Tip
In the example above, Images are organized according to two experimental conditions and one treatment, whereas Condition01 will be captured as Tag01, Condition02 will be captured as Tag02, and Treatment011 will be captured as Tag011.
Open the filled-in
Project-Name_Dataset-Name.xlsmspreadsheet.Follow the instructions here, which are also found in the three workbook tabs.
Save the file.
The OMERO Importer Python tool will run according to the specifications set by your OMERO administrator.
When the import process is terminated, you will receive an email confirming that it was correctly executed or alerting you of eventual errors.